Showing posts with label decor. Show all posts

Wednesday, July 27, 2011

Spray Paint Makes It Better…

Ah! Sweet spray paint, is there nothing you can't fix?

And by fix, I mean cover with your spray paint goodness

Bitty B's smoky yellow ceiling fan? Now a crisp clean white. {Thank you spray paint!}

My shiny brass fireplace surround? Hidden behind a beautiful sheen of oil rubbed bronze{Thank you spray paint!}  

I'm not sure what the original color on my floor vent was, but it too is covered by oil rubbed bronze. {Thank you spray paint!}

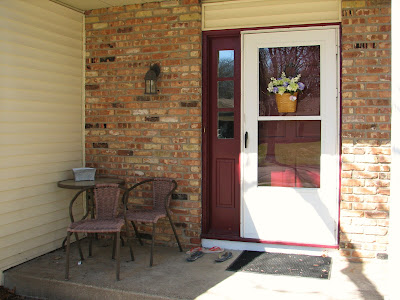
I could go on and on, but instead I will share with you the story of my front porch.  When we last saw my front porch, it was lookin’ a little sad. 

Front Porch Decor

Sad and Blah.  And messy.

But I had a vision:  A vision of a {clean} bright space that would welcome instead of causing my neighbors to raise their collective eyebrows at the crazy mess that was my front porch.

I decided to tackle the table first. 

034

Hmm.  Due to high humidity the day I disassembled the table, I had to quickly wipe the condensation off the lens of my camera and quickly take another picture before it fogged back over.

036

I removed all the legs and gave them a coat of Krylon’s white primer.  Had I thought about it, I would have lightly sanded them first, but as usual I rushed straight in with the paint. 

Because I have no patience, that’s why.

I then tried to remove the glass from the tabletop.  When it was clear that the two pieces were NOT going to part easily, I decided to tape newspaper to the tabletop and just spray away. 

But before I could do that, the wind ripped my newspaper OFF the tabletop.  I briefly thought about going inside to find more, but the humidity had water-logged my brain and I started spraying away without the newspaper protecting the glass. 

I was on a roll, people.  Newspaper be darned!

Plus, I couldn’t wait to see the color I picked out for the table in all it’s spray painted glory.

So with my Krylon Satin Jade spray paint, I went to town on my primed table.  After it dried, I pieced it back together, used Windex and a glass scraper to clean the paint off the glass and reveled in my bright new front porch:

006

I picked Jade because it reminded me of the color of the 1950’s metal patio sets that my neighbors had when I was growing up in rural Indiana. 

Don’t know what I’m talking about?  Well, here ya go: 

Lillyella

{source}

{I think every elderly relative had a set of these on their porch… : ) }

My new Jade table definitely brightens up the corner of my front porch.  And a quick coat of Kryon’s white took care of the funky silver planter.  This leaves me with just one question:

What color do I paint the chairs?  ; )

001

Well, what do you think?

Thursday, June 30, 2011

Bathroom Love…

Let me state for the record:  I love my neighborhood (and neighbors!).  I love my yard.  And I love my house. 

However, I do not love my master bathroom.  It’s tiny, and by tiny, I mean miniscule.  Maybe in 1976 people were smaller and didn’t need a lot of space.  I really don’t know. 

042

*Sigh*

See what I mean? There’s not even a tub in there!!! 

Now, if I were to design a bathroom, it would have two things:  A claw foot tub and double sinks.  The claw foot tub needs no explanation.  It’s just awesome.  As for the double sinks…  Do you live with a significant other?  Then you know what I’m talking about.  Shaving stuff (his), hair stuff (mine), tooth stuff (Bitty’s)… all on that tiny little sink. 

Wait a minute.  I just designed a bathroom with no toilet. 

Okay, if I were to design a bathroom, it would have three things:  A claw foot tub, double sinks and a fabulous porcelain throne. 

And because I designed it and didn’t let MC have any say, it would look something like this:

atticmag

{source}

Perfect!

What would your ultimate bathroom look like? 

Gussy Sews Inspiration Workshop!

Monday, June 27, 2011

5 Fabulous Fourth of July Ideas…

Ah, sweet Day of Independence!  Known for barbecues and blowing things up. Just in time for the Fourth I have found Five Fabulous Fourth of July Ideas.  Try saying that five times fast.

Fun Fact:  Did you know Canada’s Independence day is on the first of July?  Although they didn’t gain full independence from the United Kingdom until 1982…. So, I’m just saying… maybe they weren’t trying too hard or something…

And with that, I lost my Canadian readers.  All two of them. 

(Side note:  I actually love Canadians.  Really!  Since Minnesota borders Canada and the Northwest Angle is in Canada, I'm required to, eh. ; )

Now, onto the goodies!  First up is this amazingness:

iambaker

Are you serious?  This pure awesomeness from Amanda of I Am Baker was a take-off of Elissa’s cake from 17 And Baking.  Fair warning:  If you head over to either of their sites, you will be there for awhile.  Because those two are A. Maze. Ing. 

Next up is Kami from No Biggie.  She showcased these fun *free* printables over at Tatertots and Jello:

nobiggie

Have I ever told you of my love of printables?  It’s seriously a problem.  I’m on an ink restriction right now because of it.  It’s full disclosure around here, so I just thought you should know. ; )

in a bowl

I couldn’t resist these from Kami either.  Because I like food that doesn’t require too much thinking.  And people, shoving a star shaped cookie cutter through a slice of watermelon is something I can handle. 

the crafting chicks

Oh. Man.  I love when decorating is this easy.  Print page.  Insert in frame.  Done.  Jamie over at The Crafting Chicks made my day with this.  Too bad I can’t print it out.  Ink restriction and all…

baking bites

Although these patriotic strawberries have made their way around the Internets, I first found them at Baking Bites.  Nicole gives great instructions and dang, are these easy.  I may actually attempt these for the Fourth. 

madigan made

And finally, we end with these awesome Fourth of July decorations from Madigan Made.  Not only are these incredibly cute, but she made them from Dollar Store candy dishes!!!  Madigan gives a great tutorial on how she turned those star shaped candy dishes into cute Fourth of July décor and I am definitely going to try it out.

And now I just realized I have six Fabulous Fourth of July Ideas. 

Since I like the alliteration of Five Fabulous Fourth of July Ideas, I’m keeping that the title of this post.  You can consider that sixth one a bonus.  You’re welcome. ; )

What plans do you have for Independence Day? 

Thursday, June 9, 2011

Inspired by Gussy Sews…

Maggie over at Gussy Sews has created an ‘Inspiration Workshop’. 

Maggie Whitley Gussy Sews

I think this is a fabulous idea and here’s why:

I didn’t have to make/create/sew something to show off!  All I had to do was go find pictures on the Internets of what inspires me… and lemme tell you , I spend enough time on said Internets to be inspired for a lifetime. 

To make it even easier on those of us whose brains work at a less-than-quick pace, she even gives a prompt:  an idea to go out and be inspired by.  This weeks prompt is: Kitchens. 

Join me (if you’re so inclined, which I’ll assume you are since you’ve gotten to this point) as I drool over Kitchens That Are Awesome.

kitchen-design-ideas.org

Being inspired, for me, is all about pulling ideas from these pictures that I could possibly implement in my own kitchen.  Since I doubt the Master Chef would be on board with those bird’s egg blue cabinets, that’s out.  And although I love.love.love the range hood above that retro stove, my microwave currently resides there and that’s not likely to change due to a lack of counter space. 

SO… What can I take from this picture?  The legs on the bottom cabinets.  I am totally digging those.  And the moulding on the top of the upper cabinets.  Super chic and do-able.  Moving on…

kitchenremodelingexpo

Well… this kitchen is approximately the square footage of my entire downstairs.   I am currently too overwhelmed by the sheer vastness of this space to actually think.  Please excuse me while I walk away and give my brain time to remove its chin from the floor. 

northeastcabinetdesign

ACK…Soooo. oooo. ooo awesome!  I’m not even sure where to start with this one, because people, I am in love.  This kitchen and I are staring admiringly at each other and batting our eyes (yes, it loves me back!  Why would you even question that?!?)  Feet on the lower cabinets, baskets, corbels on the shelf above the range, moulding on the top cabinets… swoon…  

I don’t want to be inspired by this kitchen.  I just want it.  I think I could fit it in my front room…

Sigh.  Alright.  Begrudgingly moving on…

retrorenovation

HA!  Had you at that one, didn’t I?  Pink cabinets, orange paint and grass-like carpet… what’s not to love?!? *Snort laugh*  Can you just see the Master Chef cooking in here?

Seriously, no one could have ever cooked in that kitchen.  They’d be too busy having a seizure from the combination of all those colors thrown together.

Thank you for joining me for my first Inspiration Workshop.  As a treat for sticking around, I will leave you with a picture of my actual kitchen, which you are not allowed to make fun of.  It’s already feeling a little depressed because of that whole, ‘I want the kitchen with the baskets and corbels’ business.

house 005

Now, I have two questions for you:  What do you like/dislike about your kitchen? and

What inspires you?  Whatever it is, go be inspired today!

Gussy Sews Inspiration Workshop!

Monday, May 30, 2011

Got Wine…

More importantly, if you’ve got wine, then shortly after that you should have an empty wine bottle.  Or maybe not too shortly, I guess it really depends on how fast you drink it.  However, I find that the best wine is always drunk (drank?) with friends.  This generally results in several empty wine bottles pretty quickly.  Moving on…

A year or so ago, I attended a birthday party for one of Bitty’s friends, Little A.  It was a fabulous party.  Little A’s mom had made the most amazing cake and Little A’s grandmother was a most gracious host.  After presents were opened and while the kids played, the adults got to chat and catch up with each other.  As I chatted with Little A’s mom L and her mother-in-law C, I noticed an awesome thing on C’s countertop. 

038

See the pretty glowing wine bottle with the cutesy little grapes hanging off?  That’s what I spotted and then was gifted with!  Yep, Little A’s grandmother let me take one of her awesome creations home with me.  LOVE it!  Of course I had to know how to make them, and C gave me her simple directions.  Which I will now share with you, but with a Kadbury Spin* on them.

*A Kadbury Spin is when I receive instructions from someone, forget half of them, and then try to muddle through on my own.

Here’s what you’ll need to get started:

  • empty wine bottle
  • drill bit thingy from Home Depot or Lowes’ (I’ll explain in a minute)
  • cutesy little grapes (I found mine at Michael’s)
  • raffia (it’s that straw looking stuff, which I also found at Michael’s)
  • mini Christmas lights, with no more than 25 lights on the strand.  Make sure the lights only have one plug dealie.  (go here for an idea of where to find these)

I’m pretty sure that C told me to find the drill bit at Lowes, but I ended up at Home Depot anyway.  This is what MC picked: 

wine bottle drill bit

It’s a glass and tile bit.  It looks nothing like the thing that C used, but it got the job done. 

017

The picture is crooked and fuzzy because I just finished that yummy bottle of Cupcake Riesling.  Okay, not really.  It’s just a super bad picture.  Not everything I do can turn out great 100% of the time, although I know that’s what you’ve come to expect of me.

NOT!  ; ) 

I got MC to drill the hole in the back of the bottle.  He put the bottle in a sink full of water so that the glass wouldn’t fly out and hit him in the eyes.  Because that would be bad.  I would have also worn safety glasses, but that’s just me.

Applying firm (but gentle) pressure will get the drill bit through the glass.  Once the bit is through, slowly work the bit around the hole you’ve created until it’s big enough to fit the lights through.

019

After MC finished drilling, I cleaned the bits of label up and then sanded the drilled area so there weren’t any sharp edges.  Holding the bottle upside down, I inserted my strand of lights (I used a strand of 10) and shook them around a little to get them evenly distributed. 

025

I then took a thin little strand of raffia and tied it to the grapes.  Using my handy dandy glue gun, I glued the raffia together at the back of the bottle.  On the right is my lovely gift from C, and the one on the left is my mine.

031

Woot!  Later I added a little raffia bow.  Later than that I decided I didn’t like it and removed it, but didn’t take another picture.  Wanna see the the blue one all lit up? 

Of course you do:

035

Ooh!  Aah!  Sooo purdy! 

Now go out there, find some friends and open up a bottle of your favorite wine… Just don’t forget to save the bottle when you’re done… ; )

Sharing the love and linking up here!

Skip To My Lou                       Tip Junkie                        The Lettered Cottage

Sugar Bee Crafts                    Centsational Girl                Designer Garden

The Stories Of A 2 Z                Shabby Nest                    Tatertots and Jello

Lovely Crafty Home                 Fingerprints on the Fridge

Thursday, May 26, 2011

Nifty Banana Holder…

I was at a friend’s house recently and saw something that I knew I wanted.  It was… wait for it… a banana holder.  I know.  It’s the little things that make me happy. 

Now, it’s important to note that I already own a banana holder.  Years ago I got tired of the bottom of my bananas getting all brown and bruised, and I headed over to Target and bought this:

       031

Way back when I bought the banana holder, it matched all the blonde wood cabinets in my house. I also had no problem letting it take up space as I had so much countertop realty that I could have parked a small VW bug on my counters.  Okay, I’m exaggerating, (just a little bit) but those countertops did seem to stretch on forever. 

Since moving to our new home in Minnesota a few years ago, my little banana holder no longer matched anything in my kitchen.  If you’ve read this post, you know how much I like things to coordinate.  And so, every time I pulled it out of the cupboard, I would glare menacingly at it while trying to figure out how to make it go with the rest of my kitchen.  Not to mention it was taking up valuable space on my much smaller countertop area.   After two years in this house, I realized my options were to either buy a new, smaller banana holder, or spray paint the one I had. 

And then I saw the coolest thing.  While at my friends house, I saw that her bananas were hanging  suspended from under her cabinets.  A quick peek confirmed that, yep, the banana hook was simply screwed into the bottom of the cupboard. 

I went home inspired, and searched my house for a little hangy hook to hang my bananas from.  Realizing I didn’t have what I needed in the house, I wrote down ‘banana hangy hook’ on my Home Depot list and then went to take a ‘before’ picture of my banana holder from Target. 

It was then that I saw that the hook on the banana holder was just screwed into the holder.  After making sure that the screw was not longer than the thickness of the bottom of the cabinet (did that make any sense?), I screwed the hook into a hole that was already in the bottom of my cabinet.

 037

Please ignore the red paint smudge on the bottom edge of the cabinet.  I’ll fix it later, promise. ; )

I think the previous owners of our house must have had a whole array of things hanging from the bottom of these cabinets, based on how many holes I found.  If you don’t happen to have any handy predrilled holes in the bottom of your cabinets, it should still be pretty easy to just screw the hook in, or drill a smaller sized hole for the hook to go into.

IMPORTANT:  Before trying to drill/screw anything into the cabinets, make sure the screw is not going to go all the way through the bottom of the cabinet and make an appearance on the inside.  I will not be held responsible for pokey things sticking out of the top of the bottom shelf. ; )

033

I love my new banana hanger.  You don’t know how happy I am that:

1. I don’t have to look at the old mismatched banana hanger

2. I don’t have to store the banana hanger when not in use and

3.  I didn’t have to spend any money. 

Woot!  That’s a good day, people. : )


Monday, May 16, 2011

My Digital Frame Gets a Makeover…

Some years back, a great friend gave me an awesome gift:  A digital picture frame. 

My digital frame is like a greatest hits of my family;  it’s filled with an ever changing assortment of general  photo awesomeness.  T Bub’s baseball team winning last year’s ‘World Series’, Lovely L’s talent show performance, Bitty in her soccer uniform, dwarfed by all the other players…  

Awhile back I had moved the frame into the kitchen and although I loved it in it’s new spot, something kept bugging me.  That something was called, ‘This frame does not match the current décor in this room’. 

008

I tried really hard to ignore my brain’s constant attempts to make me notice the frame and FIX IT, ‘CAUSE IT’S DRIVING ME CRAZY.  And although I was on the verge of going batty from leaving the frame where it was, I couldn’t see any way to change its appearance to bring it in line with the pseudo French provincial feel going on in my kitchen.

Sometimes inspiration hits me and sometimes it’s a complete miss.  This time it hit me while I was at *drum roll, please*… The Dollar Store.  Yes, I see the mock look of shock and surprise on your face.  No, I won’t be changing the name of this blog to Kadbury Is… At The Dollar Store.  At least not any time soon.  Unless… The Dollar Store wants to sponsor my blog and then I can quit my day job.*

*I can’t actually quit my day job, since it pretty much consists of parenting. 

The Dollar Store has a whole picture frame section and right there next to the frames were mats that go in the frames.  My brain did a quick spin cycle and Bang!  What if I covered the digital frame with a mat???  I wasn’t sure what size my digital frame was, so I grabbed two sizes:  8”x10” and 4”x6”. 

Turned out I needed them both.  Since the size of the screen was smaller, I needed the 4”x6”, but the black plastic was really wide and I needed the 8x10 to cover the whole area.  I taped the 4”x6” bit onto the 8”x10” mat and was momentarily stuck again. 

009

How can I attach the mat to the digital frame?  My first thought after duct tape was hot glue gun, but I wasn’t thrilled with either of those options.  How about sticky Velcro?  Yep, that worked:

010

I stuck both side of the sticky Velcro to the digital frame, then lined up the taped-together mats to the digital frame and stuck them on.  Now that the mat was attached to the front of the digital frame, all I needed to do was find a picture frame that was more in keeping with the colors of my kitchen:

016

The gold picture frame is attached to the mat instead of the original back of the frame and the whole thing is held up by the stand that is on the back of the digital frame. 

digital frame redo


Now the only problem I have in my kitchen is my cooking…

040

{Mmmm!  Apple flavored cookie blob things!}

Linked up to these funtabulous girls ~ Go check them out!

Skip To My Lou                       Tip Junkie                        The DIY Showoff                  Mad In Crafts

Sumo’s Sweet Stuff                 Sugar Bee Crafts              Making The World Cuter      

The Stories Of A 2 Z                Shabby Nest                        Tatertots and Jello

 Centsational Girl

Friday, April 29, 2011

Five Things on Friday: Front Porch...

Let's sit back and take a look at my front porch:


Hey now, I didn't say point and mock!

Yes, my porch is looking a little neglected and sad. But hey! Check out that cool flower basket, isn't that awesome?

I needed some inspiration before I tackled the porch so I turned to, where else... the Internet. And I found tons of incredible ideas. So let's get right to some lovely front porches and see just what it is that makes them not sad and neglected.
Our first one is courtesy of Between Naps on The Porch.


First off, I love the red door. Second, I love the symetrical-ness (if that's not word, then it should be) of the lights and urns.
Did I mention I love the red door?

My only problem here is that I don't own any urns and having looked at the cost... let's just say that the Master chef is not on board with urn purchasing at this time.


Okay, next up is this porch:


Source


Oh. My. Awesomeness... Geraniums? Ferns? Comfy seating?
I want to live on this porch. I want to sip tea and read in the shade while my gardener works in the yard.
Alas, my porch isn't even a fraction of the size of this, so I can't really use any ideas from it. Plus, anything under my supervision that resides in a pot is soon dead. And dead plants aren't really nice to look at. Oh. And I don't actually have a gardener.


Next up:


Source


How welcoming is that? I love all the different varieties of coleus and did you see the rocking bench? Way cool.
Except that the coleus are in pots. And the rocking bench might be the actual dimensions of my entire porch. I need smaller ideas.


Source


Okay, too small.


Source


Again, beautiful... and oh, so too big for my tiny porch. Why did I pick these?!?


Okay. I give up. It's apparent to me that what I want is a full length porch with lots of seating and plants. And my poor little porch is now seeing a therapist over what can only be described as my overwhelming disappointment in it's diminutive size.


I guess I'll just have to come up with something that is lovely and welcoming all on my own, so wish me luck (Oh! And just maybe you have a great idea to help beautify my little porch? Tell me about it!).


And there you have five ideas for someone who has a lovely full length front porch.

LinkWithin

Related Posts Plugin for WordPress, Blogger...